Showing posts with label Boyfriend Post. Show all posts

Friday, February 17, 2012

Fun Friday Featuring a Post by the Boyfriend All About Water Marbles!

Good afternoon my fellow lacuqered lovers!  I have a treat for you today!  As some of you who read this blog regularly may know, I have an awesome boyfriend who I live with that is super supportive of my nail polish habits!  So supportive in fact, that sometimes, his nails have a bit of color on them.  Together we joined in a Valentine's Day contest to have both partners nails painted, and while we didn't win, the result is still pretty awesome!  I asked AJ to write the post all about it and I'm excited to show it to you!  Now, without further ado, I give you AJ's post!

~~~~~~~~~~~~~~~~~~~~~~~~~~~~~~~~~~~~~~~~~~~~~~~~~~~~~~~~~~~~~~~~~~~

Good afternoon, Lacquerites!

I was honored when Carly asked me to write a quick something for you all to commemorate my first water marbling experience!  Oh, boy.  You know, the way I look at it, I end up wearing nail polish -- often.  Not out into the world (often), but in the apartment and at cosmetics stores, you know.  I wear polish more often than you might expect!  HOWEVER -- I do not wear nail polish nearly as often as you would expect, given how much nail polish there is in the Lacquered Lover Lacquer Library!

Carly mentioned there was a gentleman nail polish blogger holding a Valentine's Day themed contest where couples submit pictures of themselves in complementary manicures.  She had just finished explaining the premise of the contest when I asked her, "so, we're definitely going to enter, right?"  It didn't take much convincing for her (or me) to decide that the only way to make a dent in the competition was to water-marble it up.  I had seen her experimenting with various combinations of polish in a few other marbles which I'm sure you've drooled over in her posts here and I was very eager to see it on my own claws.
Let's take a look at the results!


Above:  Water Marbles using China Glaze Fuchsia Fanatic, Sweet Hook, Dance Baby and Essie Play Date


Gorgeous, isn't it?  I mean, it's messy, don't get me wrong.  I ended up sticking my finger into the cup up to the knuckle and I had to give myself a bath in some acetone polish remover, but totally worth it.  We went with Valentine's Day themed colors -- purples and pinks and such.  Carly will have to tell you all the names of the polishes used in this masterpiece, but they come together quite well!  Water marbling, I've decided, is an art.  I certainly couldn't do it on my own!  A new-found appreciation for nail polish, even though I'd thought I'd seen it all!


Above:  AJ's hand water marbled and macro shots of each nail


Above:  Carly's hand and a few macro shots

Also, I must say, if you're just joining up with Lacquered Lover, please be sure to read through the previous posts and see what a magnificent resource we have in Carly's work!  Invite your friends to follow and join the party on Facebook and Twitter!  I'm proud of you, sweetie!  ;-*

What nail polish did you make your significant other wear on Valentine's Day this year?  Have you convinced your partner to try a water marble with you yet?  Aren't you thankful we have this wonderful website, Lacquered Lover, to discuss all of the hot topics in the world of manis and pedis?  Be heard in the comments below!

Monday, September 19, 2011

A Post by the Boyfriend - AJ's Guide to Frankening!

Good afternoon my fellow Lacquered Lovers! So after my post about cutting all my hair off this morning, I figured you guys could use a treat! So, the amazing boyfriend (or AJ as he is known in real life) decided last week that he wanted to start to "franken," or make his own polish colors! Below, he gives you a step to step guide (with pictures!) on how to do it with his newest color, In It To Win It! I hope you all enjoy his post!

~~~~~~~~~~~~~~~~~~~~~~~~~~~~~~~~~~~~~~~~~~

I stare on as the collection grows. Newer, prettier colors in bottles that come in more fun-shaped bottles with crazier applicator wands arrive by the truckload every day. Not that there's anything wrong with that, but I couldn't help but feel that there was something about the nail polish world that didn't sit well with me. It lacked something so rare, unique, precious, really really awesome, and (of course) modest. After some concerted thought, it dawned on me: there wasn't a polish that screamed, "AJ!" I hadn't applied my unique touch to the field. It wouldn't be fair to let untold millions of lacquered-fingered followers live their lives without knowing what I'm capable of. And, in all truth, what they are capable of, as well!

In this post, we will investigate the world of "frankening". Frankening is the act of creating your own unique nail polish. The pros: your nails are one of a kind, never replicated, never duplicated, and never to be found in stores. The cons: I can't think of any, either. I actually started completely on a whim. Carly had come back with a haul, or maybe had mentioned her encounters with ManGlaze, and I jumped to my feet and said, "well, if they can do it, so can I!" A few hours later, after a quick trip to Rite-Aid, we were stocked with a few ninety-nine cent bottles of base coat and a slew of glossy, shimmery, sparkly colors to make you go, "ooh" before you went, "aah". After a little experimenting, we granted ourselves Ph.D.s certifying ourselves professionals in the art of polish production. We decided to share the wealth. You lucky readers, you!

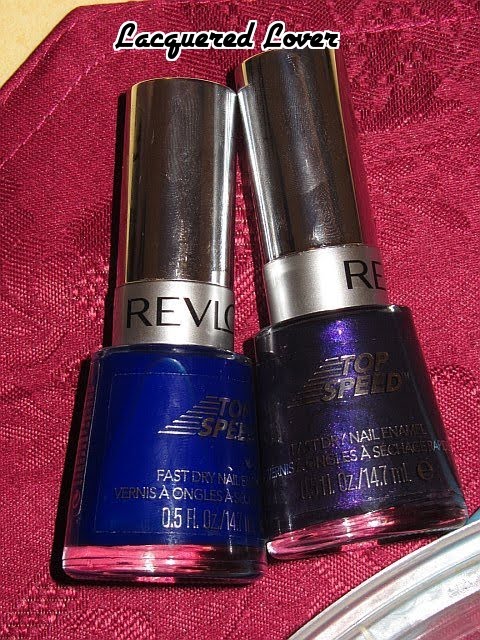
What follows is a step-by-step guide to creating your own nail polish. You will note that, in our how-to, we created a holographic color. We did so using materials that aren't necessarily "street legal", and so their mention in the process is excluded. ONLY MAKE HOLOGRAPHIC NAIL POLISH AT YOUR OWN RISK! In this tutorial, the base polish used was Revlon "60-Second Fast Dry" Grape and we used NYC base coat.

Above: Revlon Grape (on the right)

WHAT YOU'LL NEED:

bottle of discount top coat
bottle(s) of nail polish (note that the color(s) used, when mixed, may change and become brilliant! Mix a couple dollops together and try a few swatches on newspaper or nail wheels to get an idea of the color you want to make)
the SECRET INGREDIENT (for holographic nail polish)
discount eye shadow powder/palates
a plastic straw
a pair of scissors
napkins and nail polish remover (for clean-up!)


STEP ONE: Clear off the surface you want to work on and put down some napkins or newspapers that you can pour out polish onto. Be careful not to get polish on finished furniture or upholstery!
a surface to work on that can get messy

Above: Frankening Station


STEP TWO: Bend your straw in half and clip the end on a diagonal. Clip the other ends of the straw on a diagonal. You now have four pointed scoopers you can use to break up eye shadow with to add shimmer and pigment to your nail polish creation!

Above: Clip the Straw

STEP THREE: Take the polish you want to use as your base color. Pour out about one-half to two-thirds of the bottle on your newspaper or working surface. This is a great opportunity to mix polishes and play with different combinations until you get the perfect blend of awesome! Be sure to mix colors together well so you know what the final product would look like in the bottle. Pay attention to proportions -- i.e., if you use just a little bit of that sparkle to get your original polish creation just right, remember you'll have to use a little bit more than you use in your swatch to get the same distribution in the bottle.


Above: Seeing the color and pouring some out

STEP FOUR: Pour in your pigments and polishes! Using the base color bottle as the cauldron, start reciting all the lines from True Blood and Macbeth that you can remember while you whip up your new potion! Note that if you are making a holo, the best time to add the SECRET INGREDIENT is just after you pour out half of the original bottle of polish, before you start adding any new polish. Be sure to leave about one-quarter of room at the top of the bottle. You can also add the eye shadow pigment now, too, if you would like. Make sure you grind up the eye shadow so that it's as fine as possible or else your polish will get lumpy! Be careful not to overdo the eye shadow -- too much makes your polish VERY thick!


Above: Adding in pigment

STEP FIVE: Add a little top coat. You'll want to make sure your polish creation is going to be adhesive, and the clear top coat also gives you more volume without going overboard on pigment. As you use your new nail polish time and time again, you can keep your supply stocked by adding a little top coat every now and then.

Above: Pouring in Top Coat

STEP SIX: Shake, shake, shake! And just when you think you're done shaking, shake it some more! I hope I don't have to mention to make sure you've screwed the top of the bottle on very tight so you don't get polish all over you, and be sure to keep your whole hand wrapped around the nail polish bottle so it doesn't go flying out of your hand. Try rolling it between your palms to get good top-to-bottom distribution.

Above: I don't have a picture of AJ shaking but this is him working on a Franken!

STEP SEVEN: Try your new polish as a mani or pedi and make your friends jealous! You are awesome. Look at that great new color! Don't be afraid to tell everybody that you're wearing the newest, coolest polish ever made, but also be sure to tell them that they can get in on the fun, too! Send them over to Lacquered Lover and make sure you tell them to follow!

Above: AJ painted his new polish, In It To Win It, on my toes!

TIPS AND TRICKS:

If your polish is too thick, try using a little nail polish thinner.
If you don't like your polish after applying it at first, try adding a little sparkle or more color! Pour out a little of the color you don't like and try to play with the ratios.

If you end up with nail polish all over the bottle, especially under the lid or on the screw-top, be sure to clean it with nail polish remover or else you'll never be able to share your crazy new creation with anyone when it seals shut!
Revlon makes "60-Second Fast Dry" polishes that are great for holo-ing...

Have you ever made your own nail polish? Do you have any tips, tricks, or suggestions that you've discovered in the act of frankening? Any must-try combos? Be heard below!

Thursday, June 23, 2011

Nfu-Oh 64 - A Post By My Boyfriend!!!

Get ready all my lacquered lovers, this post was written by my amazing pedicurist/boyfriend AJ!

While Carly is waiting for her Mets manicure to dry (see the next post!), I thought I'd expound on her current pedicure. Applied by a professional, – that is, me – she's been rocking these holographic tootsies for about three days now, and even the x-ray tech at her podiatrist commented on how awesome they are!


I was thinking about how descriptive my Lacquered Lover gets when she talks about her nail polish after she asked me to write this for you-all's reading pleasure, but to be honest, I have no idea where to begin. Let's let the photographs of these bad boys say what needs to be said.


You're looking at Nfu-Oh's #64, and isn't it gorgeous? I'm basically given carte blanche when it comes to picking colors for pedis (except for greens, Carly would have to explain exactly why), so when I was admiring the holographic hoard from her birthday haul, I was between this purple and a #65 which is a pretty light blue shade. Seeing how last week I had put OPI's DS Sapphire on her feet, I figured we ought to change it up.

Are you loving the holographic trend you've been reading about these last few days? Do you have a go-to color for pedicures? Is there one color you simply can't stand on your toes? Would you ever take a male's assessment seriously when it comes to nail polish fashions? Join the discussion below!

LinkWithin

Related Posts Plugin for WordPress, Blogger...