Showing posts with label Holiday Nail Art. Show all posts

Tuesday, December 25, 2012

Christmas Guest Post by Destany of Manifest Destany!

Good afternoon my fellow lacquered lovers!  Merry Christmas to those of you who are celebrating today!  I am in Ohio having my very first Christmas with my boyfriends family so you will hear all about it if you follow my social media!  Today, my very lovely friend Destany of Manifest Destany has done a super cute Christmas post for you all!  Now, without further ado, on to the polish!


~~~~~~~~~~~~~~~~~~~~~~~~~~~~~~~~~~~~~~~~~~~~~~~~~~~~~~~~~~~~~~~~~~~~~~~~~~~~

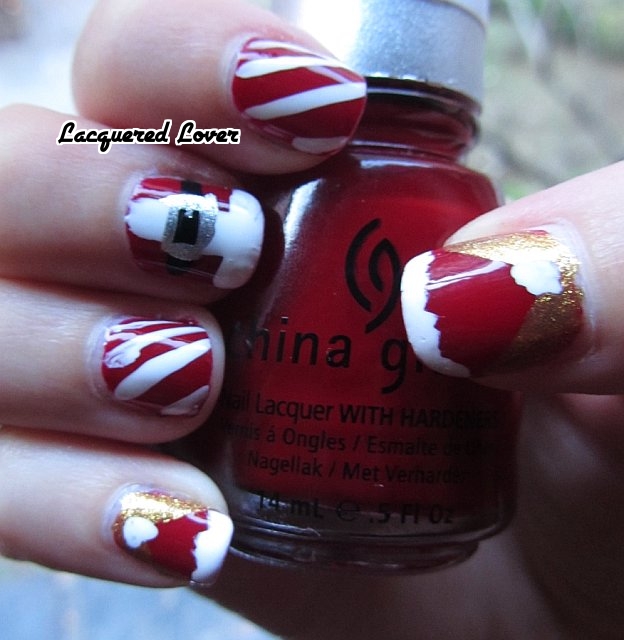
Hello all you Lacquered Lovers out there! My name is Destany, and I am so honored that Carly asked me to guest post for her wonderful blog! I thought I would try something special for you guys - so I got out my crazy nail art skills (I call them fail art skills!) and tried some Christmas trees for you! :)

First I started with a base of one of my favorite reds, Cult Nails Evil Queen - it's just an amazing color :) I topped that with Seche Vite for quick drying. Once it was dry, I used Scotch tape, and taped off triangles on my nails, with the base of the triangle at the tips of my nails. Now, all my trees are varying sizes...cause, well, Christmas trees come in all sizes! (It's absolutely NOT because I tried and tried and tried to get them symmetric, and I just couldn't do it...) Once everything was taped off, I used Wet n Wild Sagreena the Teenage Witch and painted two coats over that. Once that was done, I took the tape off. I let that dry for just a little while, but then I used a Stripe Rite silver glitter (which was provided to be by It's So Easy) and swiped it a few times across the "tree" to represent garland, and then used a dotting took with Milani Signature Gold (which was provided to me by Milani) and put a topper on the tree. The final touches were dots in Pure Ice French Kiss (blue) and Zoya Pippa (yellow). So here it is!


Have you guys tried art like this? I need to do more of it! It was really simple and so cute when it's done! Thanks Carly for letting me show your readers my Christmas trees! :)

~~~~~~~~~~~~~~~~~~~~~~~~~~~~~~~~~~~~~~~~~~~~~~~~~~~~~~~~~~~~~~~~~~~~~~~~~~

How cute are these???  I love it!  Thank you again to Destany and I hope you are all having a wonderful holiday!  Stay tuned for more posts!


What did you think of this manicure?

Friday, December 21, 2012

Lacquered Lover's Divine Caroline Christmas Tree Nail Art Tutorial!

Good morning my fellow lacquered lovers!  Happy Friday!  I am getting ready to go away for my very first Christmas today so I thought it was fitting to share my Christmas tutorial for Divine Caroline!  I also have some amazing guest post lined up for you all over the next 10 days while I'm gone so I hope you enjoy!  Now, without further ado, on to the polish!


I love my festive (and slightly goofy) Christmas tree!  In order to find out which lovely Zoya polishes I used and how to do this cute little manicure, head over HERE to see the full tutorial!  All you need is a few polishes and a dotting tool!

What did you think of this manicure?  Any plans for the holidays?

Tuesday, December 11, 2012

Lacquered Lover's Divine Caroline Hanukkah Dreidel Nail Art Tutorial!

Good afternoon my fellow lacquered lovers!  Happy Tuesday once again!   I hope your days are still going well today!  I'm very excited to bring you guys a Hanukkah tutorial today!  As tonight is the 4th night of Hanukkah, why not celebrate with some Dreidel nails?  Now, without further ado, on to the polish!


To find out what polishes I used and how to make the dreidel, be sure to check out my tutorial at Divine Caroline HERE!  It's super easy to do and a great way to be festive during Hanukkah!

What did you think of this manicure?

Lacquered Lover's Divine Caroline Snowflake Tutorial!

Good morning my fellow lacquered lovers!  Happy Tuesday!  I hope you're all having a lovely week so far!  This morning, I just wanted to share with you a simple snow flake tutorial I did for Divine Caroline last week!  Now, without further ado, on to the polish!


I used the gorgeous KB Shimmer Snow Way! that I showed you all this weekend as a background for falling snow and just love how this came out!  To read the full tutorial, check it out HERE and be sure to check Divine Caroline later for a Hanukkah tutorial!

What did you think of this manicure?  Will you try it?

Tuesday, July 3, 2012

A Fourth of July Manicure Featuring Daring Digits Cherry Square and Blueberry Square!

Good morning my fellow lacquered lovers!  Happy Tuesday!  In honor of July 4th tomorrow, I did a quick red, white and blue manicure last night using some new square glitters I got from Daring Digits on Etsy and I love them!  Now, without further ado, on to the polish!


I started off with OPI I'm Not Really a Waitress as the red base and China Glaze Neon Blue Sparrow as the blue base.  Then, the blue glitter is Blueberry Square and the red glitter is Cherry Square.  Both have matte white glitter and then square glitter!  I love square glitter!  So cute!  I love how festive this is without being too in your face patriotic!  Below are a few pictures I took with my olloclip:


So there you have it, an easy and fun patriotic manicure for the Fourth of July!  Stay tuned for more patriotic nail art tomorrow!

What did you think of this manicure?

Friday, December 23, 2011

Happy Holidays from Lacquered Lover with a Santa Manicure!!!

Good afternoon my fellow lacquered lovers!  I hope you are all having a wonderful start to the holiday season!  I have a super fun manicure to show you today, but first, some news!  This will be my last post of 2011!  I want to thank all of you for visiting my little nail polish corner of the Internet!  2011 was a fantastic year for me, I had the opportunity to start this blog and watch it grow with all of your help and it's just been an absolutely wonderful experience!  I look forward to it continuing in 2012!  I leave for vacation with my family tomorrow to celebrate the new year so I won't be back on until January 4th but don't think I forgot about you!  I plan on taking pictures of my nail polish adventures along the way! 

In other news, Lacquered Lover is getting a major overhaul early next year so keep your eyes open for a major "polish change" to come on the blog!  I'm super excited about it and can't wait to share it with all of you!  Now, without further ado, on to the polish!!!


Santa nails!  I actually did this manicure a few weeks ago for an amazing event called SantaCon.  There are SantaCons all around the world and it acts as a fundraiser for charities while people get to dress up in holiday outfits and have a fabulous day!  I couldn't decide what kind of a Santa manicure to do, so I did three different ones all rolled into one!  The red base for all of them is China Glaze Phat Santa from the 2010 Holiday Collection which is just a stunning deep red cream!  I love this polish so much!  Then I used a white striping polish for all the white, gold striper for all the gold, black striper for the black and a silver one for the belt buckle!  I think the Santa coat was my favorite!  Here I showed you both hands and some close ups so you can see that it is possible to do nail art on both hands!

Here is just a little picture of me in my full Santa costume from that day:


So there you have it!  The last post of 2011 and some fun nail art!  I hope that you and your loved ones all have a wonderful holiday season and new year that is full of love, happiness and health!  I can't wait to come back in 2012 with some new reviews, tutorials, swatches and all fun things nail polish related for you all!  Thanks again for a fantastic year!

What do you think of the crazy Santa nails?  Any fun plans for the holidays?

Wednesday, October 26, 2011

Halloween Spiderweb Nail Art Tutorial

Good afternoon my fellow Lacquered Lovers! Today, I have a little Halloween treat for you! My fabulous friend Jacki of Adventures in Acetone (isn't that just the cutest name?) did THIS amazing sparkly spiderweb nail art last weekend and I thought I wanted to try it (minus the sparkles!) So, thanks to Jacki's guiding hand, here is my Halloween spider web tutorial!


Well first, since this was a Halloween design, I decided to use my OPI Spookettes mini pack for one of the colors!


I went with "He's My Boo" as my base color because it's the perfect pumpkin orange! This is two coats and it's completely opaque. As far as I know, this color is only available in the mini spookettes set.


Next I took my Milani Nail Art bottle and brush in black to make lines. It was much easier to do part of a web so I started at the corners and made 3-4 lines (depending on how many could fit on my tiny fingernails) that all went at an angle from the same corner.


Next I connected the lines a bit apart so it gives the partial spiderweb effect. At first I thought it was done but something didn't feel exactly right to me so luckily Jacki told me to extend the lines to the edges of my fingers so it looked like the web kept going! So glad she told me that!


And here is my finished product! Not nearly as cute or as awesome looking as the picture I was going off of but for my second time ever using a nail art brush, not bad! It's definitely a cute look for Halloween!

Hope you all enjoyed this tutorial! Now go check out Jacki's post!

What did you all think of the tutorial? Have you done any Halloween Nail Art?

LinkWithin

Related Posts Plugin for WordPress, Blogger...